Fast answer:
- Choose a dovetail fixture when you have sacrificial stock, want maximum 5-axis tool access, and need dense multi-part loading.
- Choose a self-centering vise when the part needs to stay centered, geometry is irregular, or you must protect finished faces with smooth or soft jaws.
- Choose a zero-point system when setup changes are frequent, fixtures move between machines, or you want offline presetting and automation-ready quick changeovers.
- Choose a hybrid stack when you run high-mix, low-volume work: zero-point at the base, dovetail or vise on the pallet, and application-specific jaws on top.
1) Fast selection checklist & comparison matrix
Many machine shops lose time because they ask the wrong question first. Instead of asking, “Which fixture is the most precise?” ask which layer of the stack needs to do which job. In real production, you are solving three different problems:
- Part gripping: how the raw stock or finished part is actually held.
- Part access: how much clearance the cutter has for 3-axis, 4-axis, or simultaneous 5-axis machining.
- Fixture changeover: how quickly the fixture or pallet can move on and off the machine while returning to a repeatable datum.
A dovetail fixture is primarily a gripping-and-access solution. A self-centering vise is primarily a gripping-and-centering solution. A zero-point system is primarily a changeover-and-repeatability solution. Once you separate those jobs, fixture selection becomes much more logical.
| Fixture type | Best for | Main strength | Watch-outs | Typical Nextas starting point |
|---|---|---|---|---|
| Dovetail fixture | Small parts, sacrificial stock, 5-axis access, multi-part loading | Low obstruction, strong underside grip, efficient blank utilization | Needs stock allowance for dovetail; not ideal for thin finished faces or unstable castings | Single-station and three-station pneumatic dovetail fixtures |
| Self-centering vise | Irregular geometry, center datum parts, flexible jawing, mixed materials | Symmetrical clamping, repeatable centering, hard/soft jaw options | Less tool access than a true dovetail setup; jaw strategy matters | 52 mm / 96 mm self-centering vises |
| Zero-point system | Frequent setup changes, offline presetting, pallet transfer, automation | Fast repeatable changeover, standardized machine datum, multi-machine consistency | Does not replace upper workholding; contamination control still matters | Manual / pneumatic quick-change plates or MFG zero-point systems |
| Hybrid stack | High-mix, low-volume production with recurring part families | Combines quick change with application-specific gripping | Requires pallet discipline, standardized stud layout, and process planning | Zero-point base + vise or dovetail upper fixture |
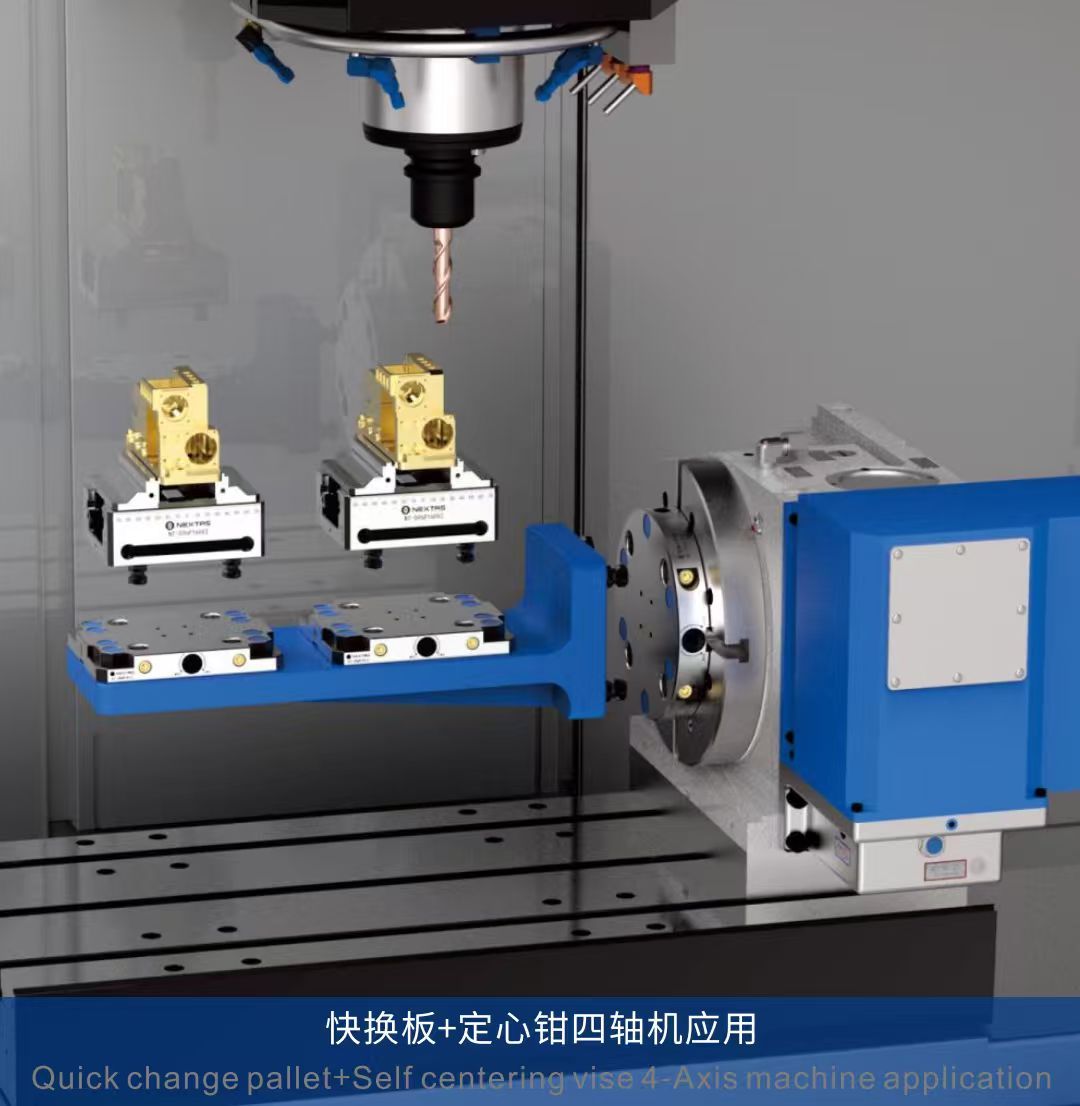
2) When to choose a dovetail fixture
Dovetail workholding is usually the most efficient answer when your part starts as a machinable blank with enough stock allowance on the gripping face. It is especially attractive for 5-axis machining of small aluminum or stainless components, because the cutter gets broad access to five sides while the grip happens from a narrow dovetail feature underneath.
In the Nextas catalogue, the single-station pneumatic dovetail fixture family is positioned for quick clamping with a >2,500 N clamping force, ≤30 kg load, and compact jaw stroke. The recommendation tables also help match dovetail size to blank thickness and width, which is useful when you are trying to standardize raw stock families before machining.
Where dovetail fixtures win
- Maximum tool access for multi-face machining without bulky jaws blocking the spindle.
- High part density when you want several blanks on one tombstone, trunnion, or pallet.
- Repeatable stock presentation for batch families cut from sawn bar or plate.
- Automation compatibility when mounted on a standardized chuck or pallet interface.
Where dovetail fixtures lose
- Parts with very little sacrificial stock or no safe place to cut a dovetail.
- Thin-wall or cosmetically critical components where bottom-side distortion could telegraph into the finished shape.
- Castings, forgings, or flame-cut blanks with too much variation for a narrow gripping feature to behave consistently.
If your programmer is already adding a sacrificial base or carrier frame to get 5-axis access, a dovetail fixture often creates the cleanest setup. But if the raw condition is inconsistent or the part must stay centered around a functional datum, a self-centering vise is usually safer.
Practical checkpoint before buying a dovetail fixture: confirm how much stock you can dedicate to the dovetail, whether that stock is removed in a later operation, and whether the gripping face remains consistent enough across the incoming blank lot.
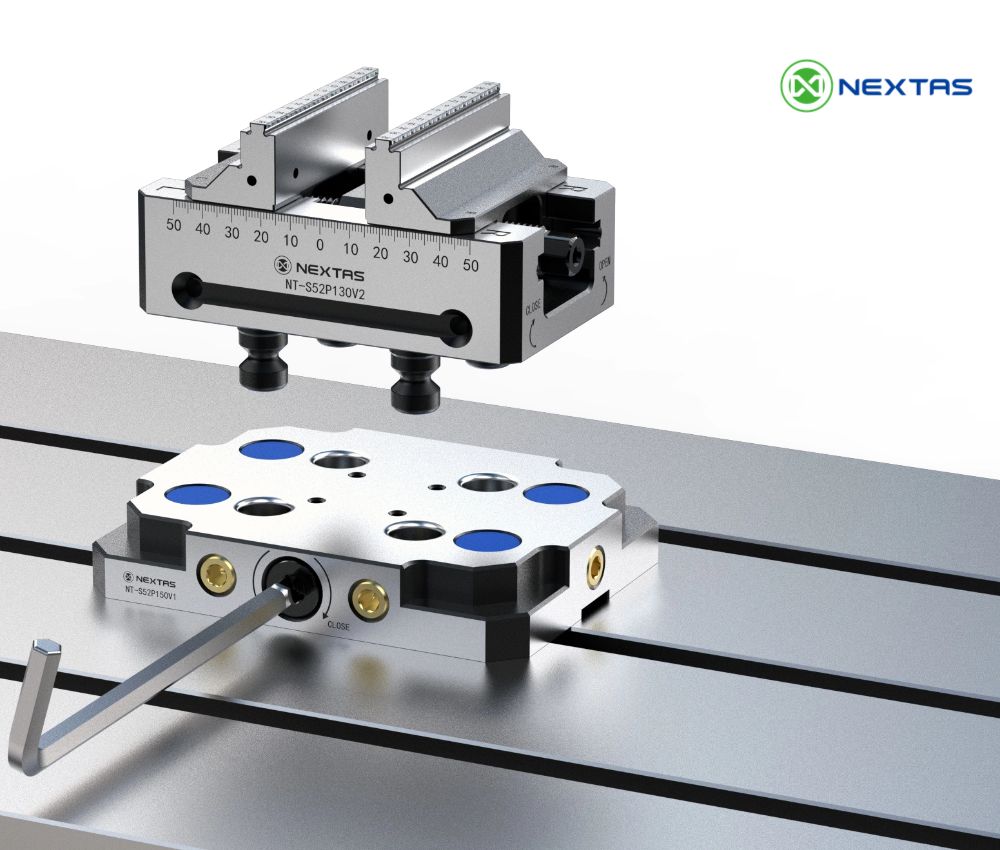
3) When to choose a self-centering vise
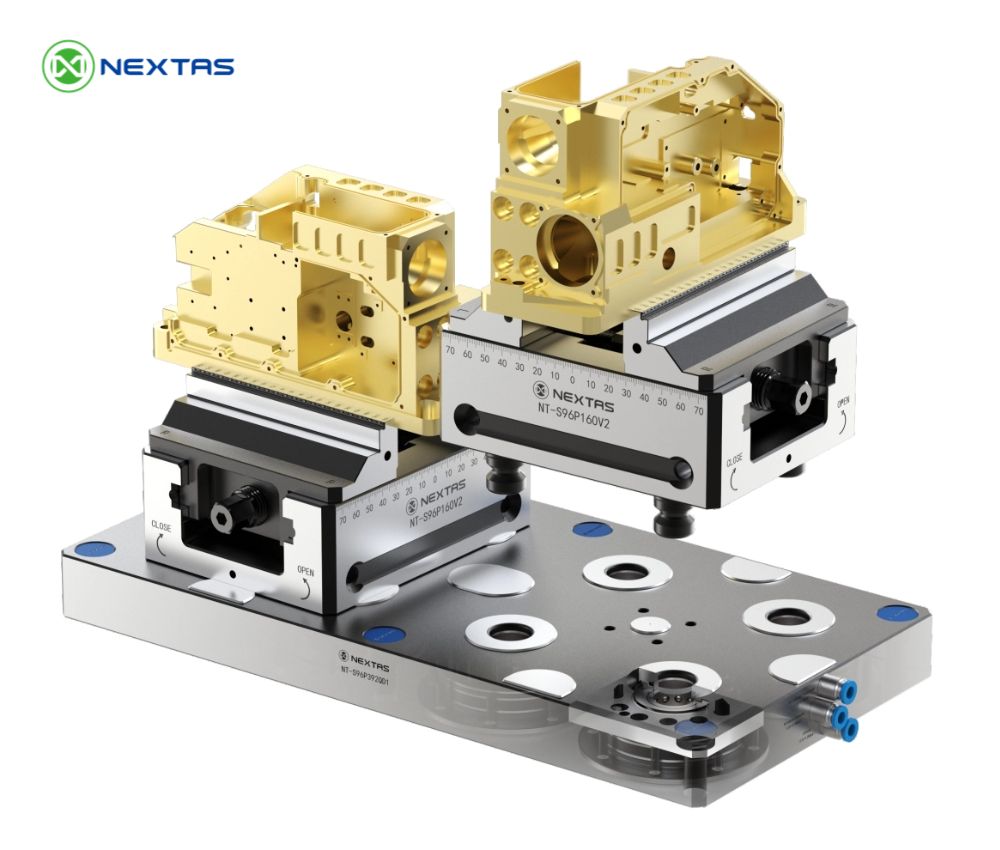
A self-centering vise for CNC machining is usually the better answer when the part must remain centered over the pallet, when the geometry is irregular, or when you need jaw flexibility for different part families. It is also the more forgiving option when the raw shape is not perfectly uniform.
The Nextas self-centering vise range gives a useful clue about where this product family sits in the stack: the 52 mm series is rated at 14,000 N clamping force with <0.02 mm repeat positioning accuracy, while the 96 mm series steps up to 20,000 N with the same repeatability class. Hard jaws can be reversed, split, or swapped; soft jaws allow conformal or finished-surface holding when a dovetail would be too aggressive.
Where self-centering vises win
- Centered datum control for parts that need symmetric stock distribution around the spindle path.
- Irregular shapes where jaw contact can be tailored more easily than a dovetail feature.
- Finished or sensitive surfaces when smooth hard jaws or custom soft jaws are necessary.
- Part-family flexibility across different widths without changing the whole pallet strategy.
Where self-centering vises lose
- Very small parts where the vise body consumes too much working envelope.
- Jobs that require the absolute maximum underside access a dovetail setup can give.
- High-density tombstone or pallet loading where a low-profile dedicated fixture can fit more parts.
For many shops, the self-centering vise is the most practical “default” upper fixture because it handles more part variation with less process complexity. If your quoting team sees a lot of complex workpieces, mix changes, and moderate lot sizes, a zero-point base plus self-centering vise is often the safest starting architecture.
4) When to choose a zero-point system
A zero-point clamping system is the right answer when your bottleneck is not part gripping, but changeover time, repeatable relocation, and machine utilization. This matters most in high-mix production, multi-machine environments, and any process that wants offline setup or future automation.
Within the Nextas range, the quick-change pallet systems live in the <0.005 mm repeatability class, while MFG and BDS datum systems are positioned in the <0.003 mm class with more aggressive clamping and automation-oriented features such as self-cleaning air, seat-check logic, lift functions, and mechanical self-locking.
What zero-point systems actually solve
- Offline setup: fixtures are loaded and indicated off the machine instead of consuming spindle time.
- Multi-machine portability: one pallet standard can move between VMCs, HMCs, trunnions, inspection, or robotic handling.
- Repeatable re-clamping: better process recovery when a part needs a second operation or engineering change.
- Automation readiness: robotic loading and pallet transfer depend on a stable, standardized machine-side datum.
What a zero-point system does not do is replace the upper gripping method. If the upper fixture is unstable, badly sized, or poorly matched to the raw stock, the base interface will not save the process. This is why the most successful installations treat the zero-point layer as infrastructure and the vise/dovetail/custom fixture as the application layer.
| Machine-side interface | Repeatability class | Typical use | Why it matters |
|---|---|---|---|
| Quick-change datum plate | <0.005 mm | Manual or pneumatic quick swaps, general CNC fixtures, family pallets | Fast standardization without over-complicating the stack |
| MFG zero-point datum | <0.003 mm | Precision CNC, EDM, robotic FMS, heavier pallets | Higher clamping force, cleaning, seat-check, lift, and automation readiness |
| BDS positioning datum | <0.003 mm | Indexed pallet transfer, 4×90° positioning, high-rigidity automated handling | Strong clamping, fixed indexing, sealed anti-chip design, handling interface |
5) How to stack fixtures for automation
This is where many buyers get better ROI: instead of asking one fixture to do everything, they standardize the machine-side interface and let the upper fixture vary by part family.
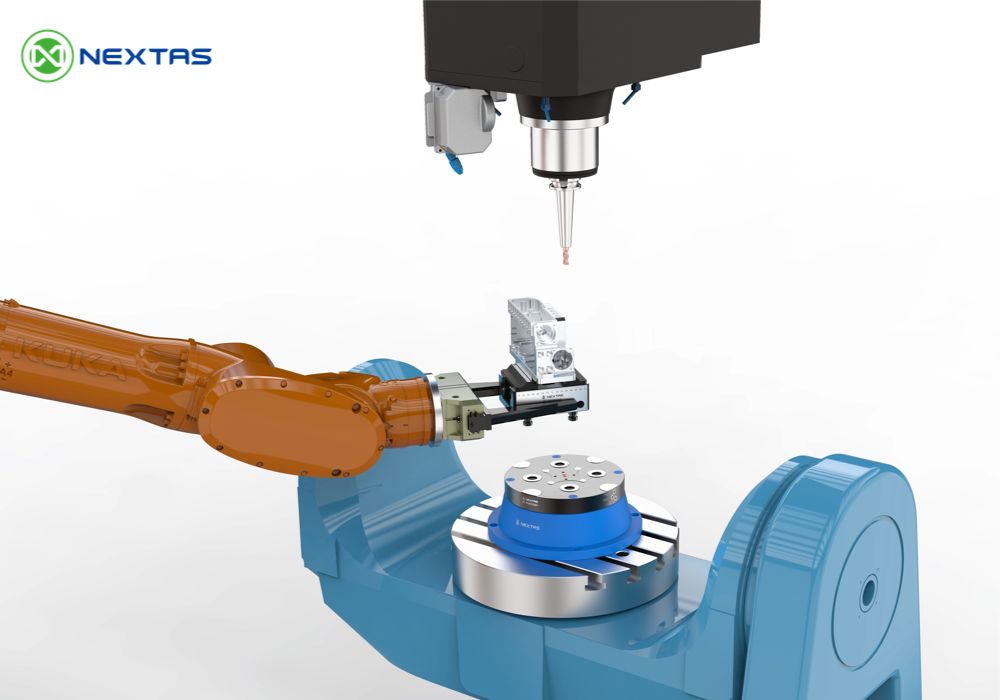
A practical automation-ready CNC workholding stack often looks like this:
- Machine table / tombstone
- Zero-point base or quick-change datum plate
- Standardized pallet or plate
- Upper fixture — dovetail fixture, self-centering vise, or custom nest
- Jaw package / locating elements
- Part
This architecture is what makes high-mix, low-volume production more scalable. When a repeat order returns, you are not rebuilding the whole process from the casting iron upward; you are recalling the right pallet and upper fixture combination.
| Part scenario | Recommended upper fixture | Should you add zero-point? | Why |
|---|---|---|---|
| Small 5-axis aluminum bracket with removable stock tab | Dovetail fixture | Yes, if setups change frequently | Best access and high part density; zero-point accelerates pallet changes |
| Valve body / manifold with center datum and multiple width variants | Self-centering vise with jaw package | Usually yes | Centered holding simplifies stock distribution and supports recurring part families |
| Electrodes or EDM pallets moving between prep, machine, and inspection | Zero-point first, then light upper fixture as needed | Yes | Relocation repeatability is the main bottleneck |
| Mixed aerospace / medical prototype queue with many one-off parts | Self-centering vise + occasional dedicated dovetail pallet | Yes | Keeps the base standard while letting upper fixturing adapt part by part |
| Robot-loaded pallets for unattended night shift | Application-specific upper fixture on zero-point datum | Mandatory | Automation needs a stable, repeatable interface with contamination control |
A simple ROI lens for buyers
Do not evaluate workholding only by purchase price. Evaluate it by spindle utilization. If the team is repeatedly re-indicating fixtures, searching datums, or rebuilding setups for recurring work, the real cost is machine time, schedule delay, and process inconsistency. That is exactly why more manufacturers are still pushing investment into automation and smart manufacturing foundations even in a cautious market.
6) Common workholding selection mistakes
- Buying for one showcase part instead of the real mix. Choose the architecture that handles the recurring queue, not the most photogenic job.
- Using a dovetail fixture where there is not enough safe stock allowance. If the blank condition is inconsistent, the process will become fragile fast.
- Expecting a zero-point base to compensate for bad upper clamping. The base returns the pallet; it does not solve weak jaw strategy.
- Ignoring contamination control. As changeovers increase, chip management, cleaning air, and seating verification become more important, not less.
- Skipping standard pallet layouts. If stud pattern, offsets, and jaw references vary every time, you lose much of the benefit of quick change.
The most successful shops standardize in layers: common stud layout, common pallet dimensions, common machine-side interface, and then fixture-specific upper modules for the actual part family.
Recommended Nextas product mapping
Start with the application, then map the stack:
- Need high 5-axis access for small blanks? Start with the dovetail fixture range.
- Need flexible centered clamping for irregular parts? Start with the self-centering vise range.
- Need faster setup changes across recurring jobs? Add a quick-change datum plate.
- Need higher-end repeatability or automation features? Move up to MFG zero-point systems or BDS positioning datum.
7) Conclusion & next steps
If you are comparing dovetail fixture vs self-centering vise vs zero-point system, the most accurate answer is usually this:
Do not compare them as substitutes. Compare them as layers in a production system.
A dovetail fixture is often the fastest route to 5-axis access for the right raw stock. A self-centering vise is often the safest and most flexible upper fixture for irregular or sensitive parts. A zero-point system is the infrastructure that makes either one faster to deploy, easier to repeat, and more automation-ready.
For high-mix shops, the strongest long-term strategy is usually a standardized zero-point base plus application-specific upper fixtures. That gives you better changeover speed today and a cleaner path to robotic loading, palletized scheduling, or lights-out operation later.
Need help choosing the right stack?
Send your part drawing, material, stock condition, machine type, and expected batch pattern. We can help recommend whether you should start with a dovetail fixture, a self-centering vise, a zero-point base, or a combined palletized solution.